AME 3623: Project 10: Finite State Machines II
NOTE: Do NOT seriously start on this project until you have
completed your project 9 code review.
- All components of the project are due by Friday, May 3rd.
at 11:59pm
- Groups are the same as for project 1.
- Discussion within groups is fine.
- Discussion across groups may not be about the specifics of the
solution (general programming/circuit issues are fine to
discuss).
At the end of this project, you should be able to:
- design a complex finite state machine (FSM) for mission-level control,
- translate a FSM design into C code
- connect FSM events to sensor events,
- connect FSM actions to control actions, and
- debug both FSM designs and code.
Project Outline
The goal for our hovercraft is to navigate through the environment
shown below. The thick lines correspond to walls.
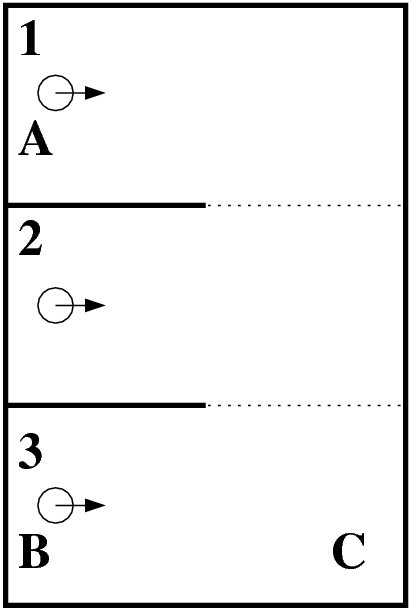
- At the beginning of a test run, your hovercraft will be
placed in either the 1, 2 or 3 configuration shown (it will be placed
in the middle of the hallway). Your program will
not be given any information about which configuration it is in.
- Your FSM must wait for SWITCH-1 to be pressed before it starts
its run.
- On start up, your program should first record the state of
SWITCH-2 and the current orientation.
- Phase 1: your hovercraft must navigate from its initial
configuration to a subgoal:
- If started in 1, then end in B
- If started in 2, then end in B
- If started in 3, then end in A
Note: "ending" at a location is very liberal; if your
hovercraft stops within 2 feet of the end of the designated
hallway, then it is considered as having arrived
successfully.
- Phase 2: depending on the state of SWITCH-2 at the beginning
of your run, the craft must navigate to a second specific subgoal:
- If 0, then navigate to A
- If 1, then navigate to C
- BONUS points: If your hovercraft started in 2 at the
beginning of the run, after visiting A or B, your
hovercraft must return to 2.
Component 1: Hardware
Make sure that two switches are connected to your circuit and that it is
clear which switch is which.
Component 2: Finite State Machine
Design your FSM on paper. This FSM must accomplish all of the above
steps, including handling the start from the switch press and the
stopped state.
Notes
- Implement your FSM incrementally: get one piece working well
first and then grow it.
- Think carefully about the possibility of sharing states
across different branches of the task.
- Draw your FSM before you implement it in code. If you
change your implementation, make the change on the diagram
first, then work on the code.
- You can do a lot of testing with your craft being held by a
group member. This will help you separate the problems of
debugging high- and low-level code (but, in the end, it must
all work together).
- This is an involved project. Start early.
- Keep your batteries charged. Use the green batteries when you
are not actually flying.
- During a run, your code is not expected to deal with the
dynamics of sliding against a wall. If this starts to
happen, then the person conducting the test will push the
hovercraft a little way from the wall.
What to Hand In
All components of the project are due by Friday, May 3rd at
11:59pm.
- Demonstration/Code Review: All group
members must be present.
The demonstration must be completed by Tuesday, May 7th in
order to receive credit for the project. However, we have a strong
preference for completing these by May 3rd.
- Check in the following to your project 10 area of your
subversion tree:
- FSM Diagram: in PDF format. This diagram must
use the "event/action" notation for the arrows.
- Documented code: See the project 1
specification for detailed documentation
requirements.
- Personal report: There is no personal report due for this project.
Grading
Personal programming credit:
- Each person must accumulate at least three personal programming
credits over the course of the semester. This project offers
one.
- To receive credit, you must be the primary designer,
implementer and debugger of the component. This does
not mean that your other group members should not be looking
over your shoulder. But: you must do the "driving."
Group grade distribution:
- 35%: Project implementation
- 30%: Demonstration of working project (to either
of the TA or the instructor)
- 35%: Documentation
Group Grading Rubric
Grades for individuals will be based on the group grade, but weighted
by the assessed contributions of the group members to the non-personal programming items.
andrewhfagg -- gmail.com
Last modified: Thu Apr 18 00:03:08 2019