Project 4: Finite State Machines
- Project checkpoint is due by Thursday, April 19th at 5:00pm.
- All components of the project are due by Thursday, April 26th
at 5:00pm.
- Discussion within groups is fine.
- Discussion across groups may not be about the specifics of the
solution (general programming/circuit issues are fine to
discuss).
Project Goals
At the end of this project, you should be able to:
- design a Finite State Machine (FSM) that performs a specified
high-level task,
- implement the FSM in code,
- connect FSM events to sensor events, and
- connect FSM actions to control actions.
Project Outline
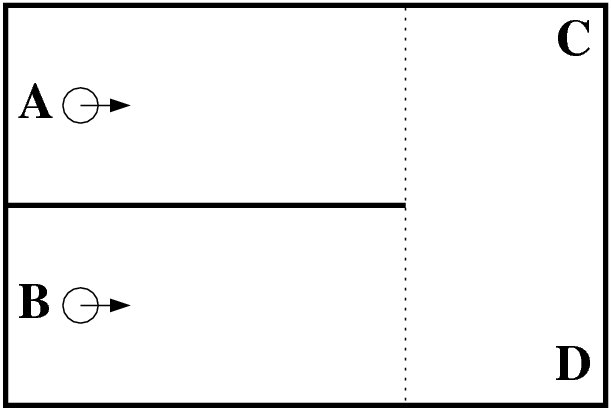
The goal for our hovercraft is to navigate through the environment
shown below. The thick lines correspond to walls.
- At the beginning of a test run, your hovercraft will be
placed in either the A or B configuration shown. Your program will
not be given any information about which configuration it is in. In
addition, switch zero will be set to some state.
- On start up, your program should first record the state of the
switch.
- Your hovercraft must navigate from its initial configuration to
the opposite end of the hall. For example, if your hovercraft
started in configuration A, it must navigate to area B.
- If the switch was originally set to state false, then your
craft must then navigate to the area near C and stop.
- Otherwise, your craft must navigate to the area near D and stop.
Project Components
All components are required to receive full credit for the project.
Part 1: Finite State Machine Design
Design a complete FSM in diagram form:
- List the actions. How the actions relate to control
signals? For example, an action such as brake
requires the reversal of the middle fan and a large middle fan
duty cycle for a brief period of time.
- List the events. How do the events relate to internal or
external information? For example, an event such as
obstacle requires that the values of the two distance
sensors are within some range.
- Draw the FSM diagram with states, events and actions listed. Include this FSM
diagram as part of your report.
Part 2: Finite State Machine Implementation
Note: this part will count for two personal programming credits
(and can be split between two people)
Add a new variable type to "project.h":
typedef enum {
   STATE_START,
   #LIST YOUR OTHER STATES HERE#
} State;
Modify your main function such that it is structured as follows
(you will of course need to add other code). Here is an outline for
the code ("NEW" lines are explicitly indicated):
int main(void) {
       int16_t counter = 0;
       int16_t heading, heading_last, heading_goal, heading_error;
       int16_t rotation_rate, distance_left, distance_right;
       State state = STATE_START;   // NEW
       int16_t forward_thrust = 0;  // NEW

       #APPROPRIATE VARIABLE DECLARATIONS HERE#


       #APPROPRIATE INITIALIZATIONS HERE#

       timer0_config(TIMER0_PRE_1024);   // Prescale by 1024
       timer0_enable();  // Enable the timer 0 overflow interrupt
       sei();  // Enable global interrupts

       // Initialize variables
       heading_goal = get_heading();

       distance_left = get_ir_distance(LEFT);
       distance_right = get_ir_distance(RIGHT);


       // Begin to lift off the ground
       set_middle_direction(HOVER);

       #RAMP UP MIDDLE THRUST TO HOVER#

       // Loop forever
       while(1) {

           heading = get_heading();
           heading_error = compute_heading_error(heading, heading_goal);

           rotation_rate = get_rotation_rate();

           distance_left = get_ir_distance(LEFT);
           distance_right = get_ir_distance(RIGHT);

           // Display
           #APPROPRIATE CODE FOR DISPLAYING SENSOR STATES WITH YOUR LEDS#

           // Finite state machine
           switch(state) {               // NEW
               case STATE_START:
                   :
                  break;
               case STATE_NAVIGATE_1:
                   :
                  break;
                :
                :
               default:
                  // this should never happen: but take safety steps
                  //   if it does
                  #Shut down craft#
                  while(1){};
           }

           // NEW
           // NOTE: forward_thrust should be set by your FSM
           pd_control(heading_error, rotation_rate, forward_thrust);

           // Increment time
           ++counter;

           if(flag_timing) {
               // Error condition: your code body is taking too much
               //  time.
               #Indicate this with an LED display of some form#

           }

           // Wait for the flag to be set (happens once every ~50 ms)
           while(flag_timing == 0) {};

           // Clear the flag for next time.
           flag_timing = 0;
       }
}
References
Hints
- Figuring out which of the two A/B configurations you are in
requires that you move to the right side of the field, and then
to look for walls in either the up or down directions. Note
that you may also have to translate your hovercraft to decide
which configuration is which.
- Implement and test your FSM incrementally. You will learn a
lot at each step that you will be able to use in subsequent
ones.
- Think carefully about what states you need for your FSM: you
might be able to combine multiple situations into one state.
- Consider using frequent braking actions.
- You may choose to user your LEDs to indicate what state you are in (as opposed to displaying sensor values).
What to Hand In
The project checkpoint is due by Thursday, April 19th at 5:00pm.
- By this time, you should have part 1 complete and part 2
partially complete (including testing).
- FSM diagram: check in your FSM diagram (this could just
be a powerpoint file).
- Code: check in your documented code to the subversion
repository by the deadline.
- Code review/demonstration: meet with the instructor or the TA to
discuss your current implementation and to show what you have
working. Plan on a 60 minute meeting. All group members should
be present.
All components of the project are due by Thursday, April 26th at 5:00pm.
- Demonstration/Presentation/Code Review: All group
members must be present. You must reserve one hour with the
instructor for this process
- Demonstrate your final product.
- Present your design and implementation (5 minutes).
The group is responsible for assembling a short presentation
consisting of 3-4 slides (on computer or in printed
form). Describe the design including:
- which team members were responsible for what
components (including the personal programming components),
- the circuit,
- your Finite State Machine diagram,
- DO NOT include low-level code (only give
the general logic and equations)
Notes:
- All team members must be able to speak to the hardware
and software solutions.
- At the end of this meeting, you will have your group
grade (individual grades will be assigned at a later time).
- Code: Check your documented code to your
subversion repository.
- Circuit diagram: check your circuit diagram into your
subversion repository. This diagram must be developed
using EagleCad (see the downloads page).
- Presentation: check a copy of your powerpoint
presentation into the subversion repository.
- Personal report: One submission per person through CATME.
Grading
Group grade distribution:
- 10%: Checkpoint
- 30%: Project implementation
- 30%: Demonstration/presentation of working project (to either
of the TA or the instructor)
- 30%: Code documentation and group report
Grades for individuals will be based on the group grade, but weighted
by the assessed contributions of the group members.
fagg [[at]] cs.ou.edu
Last modified: Thu Apr 19 15:43:32 2012