Project 4: Height Control and Finite State Machines
All components of the project are due by Thursday, April 24th at 5:00pm.
Project Goals
At the end of this project, you should be able to:
- implement controllers that manipulate multiple, independent
degrees of freedom,
- design and implement a finite state machine in software,
- use a finite state machine for control.
Hardware Overview
The hardware is the same as the previous projects.
Project Overview
For this project, you will modify your microcontroller circuit to
provide an external command interface. We will then use this command
interface to trigger a sequence of height and orientation subgoals.
In brief, your code must:
- command the heli to maintain the designated orientation and
height,
- respond to new commands by changing the orientation and height
goals in the specified manner (using a finite state machine),
- indicate the current state of your FSM using a set of 3 LEDs.
Project Components
All components are required to receive full credit for the project.
Part 1: Microcontroller Circuit
- Designate two additional digital input pins. Call these
C1 and C0 (you may choose any 2 pins).
- Connected these pins to +5V through a 10K ohm resistor (one
resistor for each pin).
- Connect a wire from each of these pins to ground. Configure
the wire such that it is easy to remove/replace.
When connected, the pin will read "0"; when disconnected, the
pin will read "1"
Part 2: Height Maintenance
Given your implementation of project 3,
implement a PID controller (proportional, integrator, derivative
controller) that moves the craft to a desired height.
Note: you may need to use a different position gain depending on
whether you have a positive or negative error (it is a lot easier to
get the craft to descend than it is to get it to rise).
Part 3: Finite State Machine
Implement in software the following finite state machine:
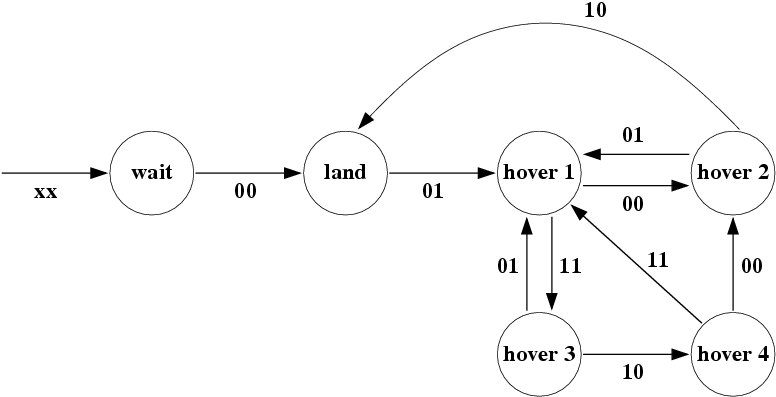
- Assign each state a unique integer between 0 and 5
- The numbers on the transitions represent events as indicated by
input command lines C1 and C0 (and "xx" means any value for each)
- Implement this FSM in software using these events
- Display the state of the FSM using a set of 3 LEDs
Note: Develop this FSM independently of Part 2. You should be able to
see the FSM state change as you alter C1 and C0.
Part 4: Finite State Machines for Control
Control the craft using this FSM:
- Each state will have its own height and orientation goals.
- Transitions may only occur after the height and orientation
goals are achieved. For example, starting from hover 4,
if 11 is commanded, this will take the FSM to hover
1. Only after its goals are achieved, may the FSM
transition to hover 3
The goals for each state are as follows:
- wait: stay on ground
- land:
- height: 0
- orientation: maintain last orientation
- hover 1:
- height: 1m
- orientation: maintain last orientation
- hover 2:
- height: maintain last height
- orientation: 90 degrees
- hover 3:
- height: 2m
- orientation: 180 degrees
- hover 4:
- height: 1.5m
- orientation: 225 degrees
References
What to Hand In
All components of the project are due by Wednesday, May 1st at 5:00pm.
- Demonstration/Presentation: All group members must be
present.
- Demonstrate your final product.
- Present your design and implementation (5 minutes).
The group is
responsible for assembling a short presentation
consisting of 3-4 slides (on computer or in printed
form). Describe the design including: your general
approach to solving the problem, the circuit, any
key software algorithms (how the general problems are solved
in code), and the
software organization (describe how the software problem
is split into different separable sub-problems, and how
the different components interact).
- Code: Turn in your documented code to the
project 3 digital dropbox on D2L (text format). Only hand in
one copy of the code per group.
- Group report: Augment your presentation with any details
that do not fit within the allotted time. You may use your
presentation format (e.g., powerpoint) for this report.
Turn in one copy per group.
- Personal report: One submission per person to the
project 3 digital dropbox. State the
relative contribution of you and your group members (in terms of
percentage of effort) (text format only!)
Grading
Group grade distribution:
- 40%: Project implementation
- 30%: Demonstration/presentation of working project (to either
of the TAs or the instructor). This demonstration is due at
the same time as the reports
- 30%: Code documentation and group report
Grades for individuals will be based on the group grade, but weighted
by the assessed contributions of the group members.
fagg [[at]] ou.edu
Last modified: Wed Apr 9 22:10:25 2008